Friday, December 31, 2010

Lemon Meringue Pie


I made a lemon meringue pie the other day, and I haven't wanted to bake anything else since. So, I basically haven't. I've baked three in the last two weeks. That's a lot of pie. I rationalized eating this pie all the time by telling myself that it contained fruit and eggs - that's basically healthy, right?

I'd recommend baking this in a deep pie dish. One of the times I baked this, I didn't have a pie dish so I baked it in a casserole with a lid. That actually worked extremely well because I didn't have to worry about the plastic wrap harassing the meringue. It looked kind of funny, though.

Lemon Meringue Pie - from Food Noveau

Ingredients
  • Pre-baked pie crust (I'm lazy and I use the pre-made pie crusts from the grocery store that you just roll out - follow the directions on the box for baking a cold pie)
  • 1/2 C Unsalted butter
  • 3/4 C Lemon juice (fresh is best, but again, I'm lazy so I often use Costco's bottled lemon juice)
  • 3/4 C Sugar
  • Zest from one lemon
  • Pinch of Salt
  • 6 Eggs - separate the whites for the meringue from 3 of the eggs
  • 1/2 tsp vanilla
  • 7 TBSP Sugar
Instructions
  1. Bake the pie crust according to the directions on the box or your standard recipe. After, turn the oven temperature down to 375.
  2. In a saucepan, put in the butter, 3/4 C of sugar, lemon juice, and lemon zest. Turn the heat on low and whisk until melted.
  3. In a bowl, beat together 3 whole eggs and 3 egg yolks.
  4. After the butter mixture is fully melted, spoon some slowly into the egg mixture and stir. Do this a few more times, to raise the temperature of the egg mixture slowly.
  5. Off heat, pour the egg mixture into the saucepan with the butter mixture. Put it back on the heat, and whisk constantly.
  6. If the eggs start to scramble - hopefully this doesn't happen - pour the mixture through a fine mesh strainer.
  7. Cook mixture until it begins to thicken. You will notice this as you drag your whisk across the mixture and the the lines you leave close up more slowly. This takes about 6-8 minutes.
  8. Pour the mixture into the baked pie crust and bake for 12 minutes. Take the pie out of the oven. It will still be rather jiggly, but don't worry.
  9. For the meringue, beat the eggs with an electric mixer on high until soft peaks form. If you're not sure what type of peak you're looking for, check this out. After the soft peaks form, add in the vanilla extract. Turn the mixer back on and spoon in the sugar one tablespoon at a time. After all the sugar is added, beat the mixture until stiff peaks form.
  10. After the meringue is mixed, spoon or pipe the mixture onto the pie. Make sure you take the meringue all the way to the outer edges, as it will shrink as it cools and this will keep the yellow part of the pie from being exposed.
  11. Put the pie back in the oven. If you have an electric oven, turn the oven to broil; if it's gas, just leave it at 375. Watch the pie, and take it out when the meringue starts to brown. This takes about 3-5 minutes, depending on your oven. Seriously though, watch it!
  12. Remove the pie and cool for at least 5 hours, preferably overnight. Let the pie sit out of the oven but not in the refrigerator for about an hour, as this minimizes the chance of the meringue cracking. Then cover and refrigerate.

Tuesday, December 14, 2010

Chocolate Chocolate Chip Almond Cookies


These cookies are delicious. I made a batch for my Grinnell secret santee. I hope she likes them. We made pretty short work of the leftovers here in my apartment. They were especially delectable right out of the oven. Recipe is here, at My Baking Addiction.

Sunday, December 12, 2010

Two Cranberry Recipes


Cranberry Upside Down Cake


Two weeks back, I found a couple of recipes using cranberries. I'd never actually used an actual cranberry in anything, despite my fondness for its flavor.

The two recipes I tried were Sugar Plum's Apple Cranberry Cobbler and Kitchen Simplicity's Cranberry Upside Down Cake.

Both of these were really good, but I ended up liking the second one more because of the caramelized brown sugar and the tartness of the cranberries. Both are really worth a go, though!
This is the base for the cobbler. You pour a biscuit mixture over the top and then bake the whole thing. Yum!

This is poor photographic proof of the cobbler when done. I was having issues with my camera.

Cranberries are really easy to work with and yield such a festive flavor for this time of year. Now I'm scheming about something to make for my family for Christmas Eve that uses them.

Long Lost Blogger

Hello All!

All the things that people say about 2L working you to death are not a joke. This semester has been crazy. I've still been baking, but fewer and fewer things have made their way onto this blog.

I'm still not quite done with this semester's final exams, but I only have one more in 4 days. I has 3 in 5 days last week, so this feels fairly relaxing to me.

I've got a whole backlog of posts, so I'll get those up in hopefully the next week.

Thanks for reading!
Christy

Sunday, November 7, 2010

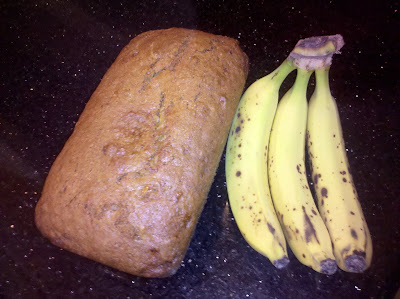
Guest Post: Myra's Banana Bread

My friend Myra and I went to middle and high school together. We are both 2L's at different law schools and she recently wrote about baking on her facebook wall. I asked her to write a guest post as I have been so busy and haven't been posting much. Coincidentally, this is the exact same banana bread recipe I use and I even make the same modifications from the original recipe!


An Ode to Forgotten Bananas
Oh, the sad tale of forgotten yellow fruit,
Picked at its peak, it begins its commute,
To the grocery store, and without a doubt,
A shopper will pick the bunch out.
Then left on the counter, alone and forgotten.
It thinks to itself, "Oh, I'll surely go rotten."
But there's a happy ending, so let's skip ahead,
those poor old bananas will soon become bread!


Banana Bread (modified from this Food Network recipe)
1 cup granulated white sugar
8 tablespoons (1 stick) unsalted butter, room temperature
2 large eggs
3 ripe bananas (or 4 smallish ones)
1 tablespoon milk
1 1/2 teaspoon ground cinnamon
1 teaspoon vanilla
2 cups all-purpose flour
1 teaspoon baking powder
1 teaspoon baking soda
1 teaspoon salt

Preheat the oven to 325 degrees. Butter a 9 x 5 x 3 inch loaf pan.

Cream the sugar and butter in a large mixing bowl until light and fluffy. Add the eggs one at a time, beating well after each addition.

In a small bowl, mash the bananas with a fork. Mix in the milk, cinnamon and vanilla.

In another bowl, mix together the flour, baking powder, baking soda and salt.

Add the banana mixture to the creamed sugar/butter mixture and stir until combined. Add dry ingredients, mixing just until flour disappears.

Pour batter into prepared pan and bake for 1 hour to 1 hour 10 minutes. Don't take it out too soon or the middle will collapse. The bread will look brown long before its through cooking, so don't let it fool you! A good test is to stick a toothpick in the center; when it comes out clean, your bread is done! Let it cool on a rack for 15 minutes. Remove bread from pan by sliding a knife around the edges, invert onto rack and cool completely before slicing.

Sunday, October 24, 2010

Cauliflower Cake

I made Smitten Kitchen's Cauliflower Parmesan Cake today. I've got a busy week coming up, so I wanted to have something all ready to eat when I'm on the run. It's delicious and was actually quite easy to assemble. I highly recommend it!

Friday, October 22, 2010

Pumpkin Whoopie Pies with Cinnamon Cream Cheese Filling


I made these a couple weekends ago. We only ate a few of them at first, and my roommate and I had grand plans of taking them to school on Monday and sharing them. Didn't happen, as there were about 3 left over after a day in the fridge. Yum!

I used Just a Taste's recipe for the cookies and my apple cinnamon cream cheese recipe from my pumpkin cupcakes. The recipe makes a whole boatload, so make sure you have somebody to share with! I ended up throwing out some batter because I was tired of baking and needed to clean up my kitchen for the guests who were coming over to eat them.

Friday, October 8, 2010

Pumpkin Cupcakes with Apple Ginger Glaze, Cinnamon Cream Cheese Frosting, and Candied Walnut Garnish


I love just about any baked good with pumpkin in it. The inspiration for these cupcakes was pumpkin + my favorite fall flavors. I took these to a party, and they were extremely well received!


For the cupcakes:
  • 1 Box of Yellow Cake Mix
  • 3 Eggs
  • 1 14oz Can of Pumpkin
  • 1 tsp Cinnamon
  • 1/2 tsp Ground Cloves
  • 1/2 tsp Nutmeg
  • 1 tsp Vanilla
  1. Heat oven to 350.
  2. Put all ingredients in a bowl and mix together until well blended. This is a thick dough.
  3. Put 1/4 C of batter into each prepared muffin cup. You will have enough batter for about 16 cupcakes. I made 12 and then baked the rest of the batter up in a mini muffin tin measuring out 1 TBSP of batter in each.
  4. Bake for 18-22 minutes. (The mini muffins take less time, but I forgot to record how long.)
For the Glaze
  • 1/2 C Powdered Sugar
  • 2 tsp fresh grated ginger
  • 1 TBSP apple juice (or more, depending on desired consistency - I made a very thin glaze that you can you barely see for the pictured cupcakes, but I'd go for a much thicker one next time.)
  1. Mix together all ingredients.
  2. Poke a few holes in the tops of the cupcakes, and pour a bit of glaze over each cupcake.

For the Frosting
  • 8oz Brick of Softened Cream Cheese
  • 4oz of Softened Unsalted Butter
  • 1 tsp Vanilla
  • 1 TBSP cinnamon (more or less to taste)
  • 2 TBSP apple juice (more or less for desired texture)
  • 2 Cups Powdered Sugar
  1. Beat together with an electric mixer the cream cheese and butter until smooth.
  2. Add in the remaining ingredients. Beat until well combined - about 2 minutes.
  3. Frosted the cupcakes. I had a fair bit of frosting left at the end, but I frosted the cupcakes rather conservatively.
For the Candied Walnuts
  • 2 oz walnuts
  • 1/4 C Butter
  • 2 TBSP Brown Sugar
  • Splash of Water
  • 1/2 tsp Pumpkin Pie Spice (Or whatever spice you're into)
  1. Melt the butter in the microwave.
  2. Add everything but the nuts, stir, cook for another minute, and stir.
  3. Dump in nuts. Cook for 40 second intervals, tossing in between. Do this 4-6 times, and sniff the nuts aggressively towards the end to make sure they aren't burning.
  4. Pour the nuts out onto a lined baking sheet or a Silpat. Allow to cool and then garnish the cupcakes.

These cupcakes are for the Sweetest Kitchen's Mystery Box Cupcake Challenge. This month's theme is "orange", which can either be the color or the flaor. I'll remind you when voting starts, so you can mosey on over and vote for your favorite cupcakes!

The winner of October’s Mystery Box Cupcake Challenge will receive prizes from:


Thank you to all our prize sponsors!

Tuesday, August 31, 2010

Oven S'Mores


I am obsessed with S'mores. I made S'more cupcakes early this summer. Then I revised the recipe into a bundt-style recipe. The batter looked pretty:


Last week, Our Best Bites posted a recipe for oven S'mores. I wish I'd never considered the option of making an actual S'more in the oven. It was way, way too easy. At least with a cupcake, I have to dirty some bowls.

Here's what you do:

1. Turn your oven to broil.

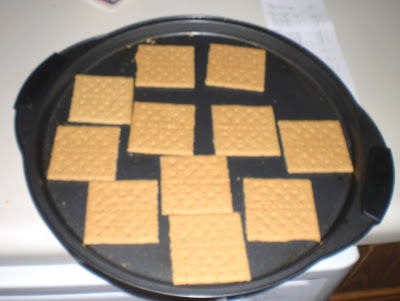
2. Lay out all of your graham crackers on cookie sheets

These graham crackers are upside down! Don't do this!

3. Put your marshmallows on top.


3. Get your chocolates ready! I used Reese's Peanut Butter Cups and Hershey Bars. Yum! Once you pull the pan out of the oven, you've got to go go go, so make sure you have all of the candies unwrapped and broken.

4. Put the pan in the oven for 1-2 minutes, whatever your marshmallow preference is. I'm a big fan of burned marshmallows, but I realized this was kind of burning the graham crackers, so be aware of that!


5. Pull them out when you're content with the marshmallows' brownness. Put the chocolates on top as quick as possible!


6. Stick the second graham crackers on top! Done!

I ate one while it was hot and then shoved the rest in the freezer so they'd cool and be easy to stack up in a tupperware. These babies were bake sale bound!


Monday, August 9, 2010

Gelato

I am on vacation with M's family at their lake house in North Carolina. His mother recently bought a gelato maker on deep discount at Williams Sonoma. M's mother is a bargain hunter. I think she bought this for less than 25% of its retail price.

We have made an absolutely obscene amount of gelato this week. It started simple - vanilla, bittersweet chocolate. Then we branched out to banana stracciatella and almond wine. I think my favorite flavor is lemon - we've made it three times already and it's absolutely divine on M's grandmother's peach cobbler made from South Carolina peaches. Yum, yum, yum.

Back to Iowa City tomorrow. 2L year begins Wednesday.

Sunday, July 25, 2010

Multi-Cereal Treats


Earlier in the summer, M and I bought a giant multi-pack of cereals from Costco. It had 30 boxes of Kellogg's cereals in it. As of this morning, we still had 10 boxes left. I'd eaten all of the Raisin Bran, all the Frosted Mini Wheats, and a good portion of the Frosted Flakes. I decided to make a variation on Rice Krispie Treats to try to get rid of some of the cereal before we move next weekend. I used Rice Krispies, Corn Pops, Fruit Loops, and Corn Flakes. All in all, not a bad way to use up an excess of cereal. Now...what in the world and I going to do with the leftover Apple Jacks? I never did like those...

Recipe - okay, you probably know this one, but just in case!
  • 3 TBSP Butter
  • 4 C Mini Marshmallows
  • 6 C Cereal (we used 7 mini boxes that we measured to have just under a cup in each of them)
  1. Melt butter in large pot over medium heat.
  2. Add marshmallows and stir until melted.
  3. Turn off heat and stir in cereals.
  4. Put in a 9" X 13" pan coated with non-stick spray.

Saturday, July 10, 2010

Lavender Milk Tea Cupcakes for Sweetest Kitchen's Mystery Box Cupcake Challenge!


Inspiration
I am in law school. I study for a significant portion of my waking hours. One of the locations I like to study at is the public library. It looks like this:

This library is great. It has lots of big tables, tons of plugs, and best of all, a wonderful little coffee shop in the lobby. When I face a particularly grueling day of studying, I go to this library and promise myself the reward of their amazing lavender milky tea. I'd never had milky tea before this coffee shop, but it's quite popular in Hong Kong. (Thanks for the knowledge, Wikipedia). Anyway, what I like most about this tea isn't the it's milk + tea (that's fairly standard, I'd say), it's the lavender. Lavender is absolutely delicious in this drink and completely makes it the wonderful thing that it is.

The Great Search

Culinary Lavender

The coffee shop makes their lavender milk tea with a lavender syrup. After searching the internet, I found a few different options of incorporating lavender into baking.
  1. Lavender Oil
  2. Lavender Sugar
  3. Lavender Syrup
Unfortunately for me, these all required me to find the product, find some lavender, or pay stupidly expensive shipping costs and risk the lavender product not arriving in time to enter the competition.

Lavender is tricky. It is a flower, but it's not a flower people always eat. That means that if you're using lavender in cooking, you have to be exceedingly careful that it is food grade lavender, preferably organic, and not covered in pesticides or inedible oils meant for massages, etc.

There is a wonderful cooking store in Des Moines (Shout Out: Kitchen Collage) and I recently bought lemon and orange oil there by a brand that makes lavender oil. However, they did not carry the particular line from the brand that has lavender oil in it, so my local search continued.

There is a farm here in Iowa called Mariposa Farms that sells fresh herbs in tons of grocery stores. According to their website, one of the herbs they sell is lavender. I decided to check the local grocery store chain Hy Vee. No luck.

My next thought was that I would go to the fancy gourmet market - Gateway Market - and see if they had fresh lavender or any type of lavender product. I met a lovely store clerk there would was an absolute peach. They didn't have any lavender, but he offered to call his ex-wife (seriously, WHAT A NICE MAN!!) because she owned a bakery and might have some info. This was the low point of the day, as she told him that she got her lavender supply from Chicago and she wouldn't be willing to sell any to me since she herself is a baker. Boo.

At this point, I went to my mother's house and pouted. Considered a different theme all together. BUT NO, THIS WAS A FLAVOR COMBINATION OF WONDER. Then my mother suggested we hit up one of the health food stores right by her house. They have tons of herbs available by the scoop and also a wide selection of teas. At this point, I was just hoping for a lavender tea I could sift the lavender out of or something. But, BUT, they had a huge bin of fresh lavender and it was very reasonably priced. So, thank you Campbell's Nutrition for helping me out on this quest! I couldn't have done it without you!

Issue #1: How to get the lavender in the cake
From the list above, I quickly eliminated making lavender oil. It looked complicated and I don't know much about oils. I considered lavender sugar and it might have been preferable, but I didn't have two weeks to let it steep. I decided to go with making lavender syrup. I tried to use my skills from 7th Grade science to cook the syrup back down to just sugar crystals, but I got too nervous about burning the whole thing and pretty much just ended up with a thick and concentrated lavender syrup. It also had buds floating in it because my summer rental lacks a fine enough strainer to get them all out. Still, it smelled amazing and I decided it would work fine as substitution for a bit of liquid and sugar in the recipe.

Issue #2: How to get the tea in the cake
I didn't want a subtle tea flavor - I wanted these to actually taste like tea. I found a recipe that suggested 6 tea bags was the magic number in making the flavor actually be tea-y, so I used 3 of my family sized tea bags.
The difficult part of this was that many of the lavender cupcake recipes out there substitute the lavender syrup for any other liquid in the cupcake. But...I don't think you can steep tea bags in syrup. So, I had to come up with a way to make this work. I briefly considered using ice tea mix, but I have a deep aversion to instant tea and couldn't bring myself to do it. I ended up using a tried and true white cupcake recipe as the base and steeped the tea bags in the listed amount of milk after boiling it. I know from experience that this cupcake can be a bit dry, so instead of adding extra milk as I normally would, I added the lavender syrup instead. VICTORY.


Recipe
Concentrated Lavender Syrup
  • 1 Cup Granulated Sugar
  • 1 Cup Water
  • 1/4 C Culinary Lavender Blossoms
  1. Put all the ingredients in a pot. Boil. After boiling, turn off heat, cover, and let sit.
  2. After 5 minutes sitting, strain the mixture into a sauce pan, removing as many blossoms as possible.
  3. Bring the mixture to a boil. Allow to boil for 3-5 minutes, stirring frequently to prevent burning. This will boil off some of the water and make a more concentrated syrup.
  4. Place in refrigerator and allow to cool. Make sure you use this the day you make it, as the sugar tried to escape the solution since it was beyond saturation the next day. Oh, science.
Cupcakes
  • 3/4 C Milk
  • 6 Black Tea Bags
  • 3-6 Tbsp Lavender Syrup
  • Heaping 3/4 C Sugar
  • 1/2 C Unsalted Butter (softened)
  • 2 Eggs
  • 1/8 Tsp Vanilla Extract
  • Scant 1/8 Tsp Lemon Oil (Optional, I'm just obsessed with it right now)
  • 1 1/2 C Flour
  • 1 3/4 Tsp Baking Powder
  1. Preheat oven to 375 degrees. Line a 12 cup muffin tin with liners - you will probably have about 4 extra cupcakes on top of this, however.
  2. Bring the milk to a boil, either in your narrowest sauce pan or in the microwave. Add the tea bags and allow to steep, off the heat, covered. You want to get the most tea out of these bags as possible, and the most difficult part for me was having deep enough milk.
  3. After about 5 minutes, squeeze out the tea bags and transfer the milk/tea mixture back into a measuring cup.I lost about 1/4C of milk when it boiled, it will probably vary for you. To make up the difference, add lavender syrup. If you've added 6 TBSP and it's not yet back up to 3/4 C, add in milk until you get there. It will dilute the tea mixture, but that's better then overpowering lavender. Put in the freezer to cool down quickly - do not use right away!!
  4. Cream together butter and sugar. Do it longer than normal , at least 5 minutes. This batter needs air.
  5. Add in eggs, one at a time, and beat them in for about a minute each.
  6. Add in vanilla & lemon oil. Beat thoroughly.
  7. Add in flour and baking powder. Beat thoroughly.
  8. Add in milk/tea/lavender mixture. This is a lot of liquid for the batter to take up, so give it time. Beat until very well incorporated.
  9. Fill the cupcake liners. I would opt for just under 1/4 C of batter for each. I went above this and got weird, spread out, cookie tops that I ended up pulling off. (The muffin top was not all that.) This is probably a symptom of my janky summer oven, but just to be safe, go on the small side.
  10. Bake for 20-25 minutes until the tops are firm and stick inserted comes out cleanly.
  11. Allow to cool in the tin for at least 10 minutes before removing them. I am the worst about removing things early, but these are a pretty fragile cake, so really let them sit.
Frosting - Adapted from Our Best Bites
  • 4 1/2 TBSP Flour
  • 3/4 C Milk (I usually use skim, but I used whole milk because I really wanted a very milky flavor)
  • 3/4 C Unsalted Butter (real butter, and softened)
  • 3/4 C Flour
  • 1 TBSP of Lavender Syrup
  1. If this is your first time with a frosting like this, I highly recommend you hop over to Our Best Bites for their wonderful mixture tutorial.
  2. Add flour and milk to a pan. I like to use my 10" frying pan. Heat over medium heat, and whisk constantly to get flour to dissolve into milk.
  3. Keep whisking. As soon as you see the whisk drag and the bottom of the pan peep through, remove from heat.
  4. Strain through your finest sifter to get out clumps, and refrigerate. Make sure it's really not warm, or it will ruin everything in the following steps.
  5. Cream together butter and sugar.
  6. Add the lavender syrup to the flour/milk mixture. Pour that mixture on the butter and sugar. Beat forever. No really, it takes at least 5 minutes.
  7. This frosting looks weird for a bit, but do not despair. Keep mixing!
  8. Eventually, it will be gorgeous, poofy, and milky deliciousness.
Assembly
  1. Frost cupcakes generously. Add sanding sugar or lavender blossoms as garnish. (I used this light blue sanding sugar.)

Oh right, this is a contest!
Now, about this contest! It's all explained here - it's The Sweetest Kitchen's Mystery Box Cupcake Challenge. Every month, there's a different ingredient that must be used in the cupcake. This month's ingredient was tea!

Voting starts on or about July 20th, so please go check it out! I'll remind you when the time comes!

This competition is really awesome because there are such wonderful prizes!
The winner of July’s Mystery Box Cupcake Challenge will receive prizes from:
Thanks to all our prize sponsors!

Saturday, July 3, 2010

Smitten Kitchen's Lemon Bread


I made Smitten Kitchen's Braided Lemon Bread. Oh, my goodness. So, so delicious. I followed the recipe except that I recently bought some lemon oil so I substituted that for the lemon zest and I used some fancy lemon juice the boyfriend got at Costco instead of fresh. Also, um, I beat yeast. I made it work! In case you hadn't noticed, yeast and I don't tend to get along. This is one of the only things I've ever made with yeast that worked out. Woohoo!

Thursday, July 1, 2010

Red Velvet Cupcakes without Food Coloring


Okay, I admit it, they aren't red. They are light brown and look like a milk chocolate cupcake. But they (theoretically) taste the same as red velvet cupcakes, I didn't have to go to the store, I got to use up my expiring buttermilk, and I got to test out a recipe for my secret project.

Also, I must admit, they are not very good. The recipe I used had me add 1 tablespoon of baking soda. I believe that was too much, as they taste really, really alkaline. Not a fan. Cream cheese frosting made them better, but I'm going to use a different recipe for the secret project.

Boyfriend's boss liked them though. And she was in desperate need of a cupcake because she found out she'd lost a big case just prior to encountering them.

Key Lime Pie

My friend Allison came through on a quick visit earlier this week while back in the Midwest for a wedding. She and I had recently dicussed Ben & Jerry's Key Lime Ice Cream and our inability to find it. This is unfortunate because it sounds pretty awesome.

With Allison coming to town and her birthday just around the corner, I decided to make the next best thing - a key lime pie.

Key lime pie is one of the first things I ever learned to bake. I probably made 5-10 of them in the summer of 2007. That summer, I worked three jobs (Security, Alumni Relations, and a Thai restaurant), had six roommates, and taught myself how to stay alive in America. This on the heels my adventures in the Czech Republic, from which I returned with what Allison and others will always call "clown mouth" -- AKA lesions on the sides of my mouth from vitamin deficiency and clear indication that I was not an adult. ANYWAY, BACK TO THE PIE.

Key lime pie is really, really easy. I consider it one of those things where, if you go above 4 ingredients for the filling, you're doing it wrong.

Key Lime Pie
4 Egg Yolks
1 Can Sweet & Condensed Milk (I'd use Eagle Brand or Carnation - brand names for something like this)
1/2 Cup Lime Juice (Fresh is best, even if it's just a normal lime, not a key lime)
1 tsp Vanilla
9" crust (You can make your own graham cracker crust, but sometimes I'm lazy and just buy a pre-made one. Homemade is amazing, but sometimes I'm not up for the mess.)

1. Preheat oven to 350 degrees.
2. Stir together egg yolks and S&C milk until smooth. You really want smoothness.
3. Wisk in lime juice until well-combine and consistent throughout. If you think this thing needs to be green (heathen), then add your food coloring in.
4. Pour into crust and bake for 15 minutes. Allow to cool to room temperature and then refrigerate until serving.

Friday, June 25, 2010

Avocado Cake

Not the most delicious looking photo ever - I forgot to take one when it finished baking and I didn't have any cooking spray so I had to use butter and flour to keep it from sticking. Still tasted good though!

I am living with my boyfriend this summer, and that boyfriend has an obsession with Costco. Due to this obsession, we seem to frequently end up with way too much of something that is perishable. One week, our excess was avocados. Now, I love guacamole as much as the next person, but I can only eat so much of it. A college friend had tried CakeSpy's Avocado Cake and said it was really good, so I decided to give it a try. Verdict: It's pretty good. It also go better the longer it sat out and bonus point - it's vegan if you make it with oil!

Thursday, June 24, 2010

Engagement Party S'More Cupcakes


I am officially at the phase in my life where everyone I know it getting engaged. I have had at least 3 law school classmates get engaged over the summer break - I will surely find out about more when I go back to school in the fall!

I made these cupcakes for the engagement party of a dear high school friend's older sister. In all fairness, she didn't ask me to bring anything, I just had a baking urge and the engagement party seemed like an excellent opportunity to pawn off some of my baked goods!

I am a big fan of S'mores. But S'mores aren't a food I get much opportunity to eat these days, as I am what might be described as...indoorsy. No bonfires in my recent past or foreseeable future, that's for sure.

However, I think I came up with a delicious S'more Cupcake recipe after using an amalgamation of many other recipes.

INGREDIENTS

Cupcakes - Adapted from Our Best Bites and Bakerella
2 C Flour
1/4 C unsweetened cocoa powder

1.5 t baking soda

1/2 t salt

1 C granulated sugar

1 C firmly packed brown sugar

1/2 C (1 stick) uns
alted butter at room temperature
2 large eggs

2 t vanilla extract

1 C luke warm water

1/2 C buttermilk

1/4 C Graham Cracker Crumbs

Filling
Toasted Marshmallow Creme
(Regular will work just fine, but the toasted is a fun touch!)

Frosting
Our Best Bites'
Chocolate Frosting
Follow their directions, as this was the first time I made it and it worked out perfectly!


Directions
1. Preheat oven to 350 F. Sift flour, salt, and baking soda into a medium bowl.

2. Cream the butter and the sugars together with a mixer on medium speed until fluffy and well incorporated. Add in eggs, one at a time and mix until fully incorporated. Add in vanilla and continue to mix until smooth.
3. Mix together buttermilk and water. Add 1/2 of the buttermilk/water mixture to the butter/sugar/egg mixture and alternate with the flour mixture. This is going to look a little weird - don't worry. It will work itself out.
4. Divide the batter in half - there should be about 6 cups total. If you mess it up, you just won't end up with equally chocolately and graham crackery cupcakes. Not the end of the world.
5. To one of batters, add the cocoa. To the other batter, add the graham cracker crumbs. Mix both until well incorporated.
6. Add your cupcake liners to your muffin tin. I used foil to evoke camping, but part of what's really cool about these cupcakes is the two color thing - that's not visible if you use foil!
7. For each cupcake, add two tablespoons of the graham cracker batter and top with two tablespoons of the cocoa batter.
8. Bake cupcakes for 15-20 minutes. I wish I could be more definite, but my summer oven is a weird one and I pretty much have to watch everything and don't think it provides much indication of what others' ovens might do.
9. After cupcakes have cooled, fill the cupcakes with the marshmallow fluff. Don't go overboard, as it's really sweet.
10. Frost cupcakes with the chocolate frosting. Sprinkle graham cracker crumbs over the frosting and top it all off with a marshmallow!

Friday, June 4, 2010

Flan & How to Carmelize Sugar


Hello Friends! Sorry I've been out of commission. My computer fan bit it slightly after finals and work/journal/moving has absorbed lots of time.

I made flan for one of my study groups during finals, and never did get it up here. So, here you are!

Flan (adapted from Food Network)
- 1 1/2 c white sugar
- 2 standard sized cans of sweet and condensed milk (I am a big off-brand shopper, but you can really taste the difference in this. I'd go with Eagle or Carnation for this)
- Milk to fill each of the cans
- 8 Eggs (It's a custard, what do you expect?)
- 1 Tbsp almond extract (I probably actually use more than this, but I'm an almondoholic)
- 1 tsp vanilla extract
- 1/4 tsp salt

1. Preheat the oven to 325. Caramelize the white sugar over medium heat. If you've never done this, I highly recommend this video. The first time I made this, it took me 4 tries to get it to work. Caramelizing sugar is a skill, you should have it! Here are some photos to walk you through the process.
Sugar in the saucepan
The sugar will start to clump up. This is the sugar starting to melt and it sticking to itself.
Then it gets really clumpy and starts to turn color. Almost there.
Ta Daa! Caramel!

2. Pour the caramel in the bottom of your dish. I use at 8" x 8" Pyrex for a nice, thick flan. If I had a prettier dish, I'd use that. Do this quickly, and be sure to tilt the dish so that the caramel spreads around evenly.
3. Whip the eggs until smooth. Then pour in the two cans of sweet and condensed milk. This stuff is weird, if you've never used it - you'll probably need a spatula to get it all out. Mix the sweet and condensed milk into the eggs - the s & c will try to sink to the bottom, but try your best to blend them together.
4. Fill the cans up with regular milk and pour that milk into the mixture.
5. Add in the almond, vanilla, and salt and stir until totally blended.
6. Pour the mixture through a strainer (to remove weird extraneous egg stuff) and into the baking container.

That weird texture on the surface? That's me forgetting to strain the mixture before putting it in the Pyrex.
7. Bake in a water bath. I usually use my 9" X 13" Pyrex for this. Place your baking dish in a larger, oven safe container. Fill outer container with warm water so that the water reaches about halfway up the sides of the baking dish.
8. Bake covered with aluminum foil 90 minutes or until center is firm.
9. Chill until serving. To serve, invert the flan onto a serving dish and let sit for a moment while the caramel pulls away before removing the baking dish.

Wednesday, March 31, 2010

Buffalo Chicken Mac & Cheese

I went to Ann Arbor for my spring break to visit M and some old friends. On my last night in town, we went to the Blue Tractor restaurant. I had a pretty amazing BBQ sandwich, but the real show stopper was a friend's buffalo chicken mac and cheese.

Fast forward to a potluck I had to go to this last Sunday. I knew I wanted to make some type of similar mac and cheese. I searched the Food Network website and found this wonderful recipe from the most recent Food Network Magazine issue.

I altered it a bit to use what I had in the fridge and my own preferences.

Ingredients:
- 2 chicken breasts
- 1 stick of unsalted butter
- 1 pound elbow macaroni
- 1 small onion, chopped
- 2 minced cloves of garlic
- 3/4 C of Frank's Red Hot (more to taste)
- 2 TBSP flour
- 2 tsp dried mustand
- 2 1/2 C half and half (I used 1 1/4 C cream and 1 1/4 C skim milk - it was fine)
- 16 oz grated cheddar cheese ( I used the random yellow cheeses I had in my fridge)
- 8 oz grated pepper jack cheese
- 2/3 C Low Fat Sour Cream
- 1 C panko bread crumbs
- Up to 1/2 C of blue cheese (I used a tiny wedge of Maytag Blue Cheese and it was more than enough)

1. Place the chicken breasts in a pot and cover with water. Bring the water to a boil, cover, lower the heat to low, and allow to cook for approximately 8-10 minutes. Take one out, cut it open, and check to make sure it's cooked through. If not, allow to continue cooking. After chicken is cooked through, shred the breasts into fine pieces using two forks.
2. Preheat the oven to 350 degrees. Cook the macaroni - it is okay to slightly undercook it.
3. Melt 3 TBSP of the butter in a pan over medium heat. When the butter is melted, add the chopped onions and cook until softened. Add the chicken and garlic and allow to until fragrant. Pour 1/2 C of Franks Red Hot and stir until well distributed. It will look like this:


4. In a new and large pan, melt 2 TBSP of butter and mix in the flour and the mustard. The pan will seem to large now, but I promise, you need it. Add the half and half and whisk until the flour mixture is incorporated. Next, add in the last 1/4 C of the Franks. After fully incorporated, add the grated cheeses and stir until incorporated. Stir in the sour cream until incorporated fully.
5. Melt the remaining butter in the microwave. Mix in the blue cheese and the panko bread crumbs as evenly as possible.
6. Layer the different elements in a 9X13 pan as the diagram below shows:

7. Bake the casserole for 30-40 minutes, until it bubbles. Take it out and let it sit for about 10 minutes before serving.

Tuesday, March 30, 2010

Carrot Cake Sandwich Cookies


I made these wonderful cookies from a recipe on Abbey Goes Design Scouting. They are carrot cake with a honey/cream cheese filling. The cookies were amazing, but I didn't so much like the filling. Next time, I'll use a traditional cream cheese filling. (Also, these were for the LSRJ Conference - no recreational baking here!)

Thursday, March 25, 2010

Cake Withdrawl


Since the beginning of lent, I've been suffering from cake withdrawal. More precisely, cake-baking withdrawal. I've still managed to eat plenty of cake, don't even worry. Hungry Hobo is entirely too close to my apartment to curb overall consumption.

This weekend, Law Students for Reproductive Justice had our regional conference at the law school. Members were asked to donate some baked goods for breakfast and snacks during the conference. Yes! There has not been a single bake sale for me to participate in since Valentine's week, so my charitable baking option have thus been severely limited.

Anyway, I baked a pear bread cake in my Pampered Chef fluted pan.

Recipe comes from Smitten Kitchen. I switched it up ever so slightly by substituting 1 cup of the three with whole wheat and I used canola oil. I don't tend to use oil over butter, but I was too excited to bake it to wait for the butter to soften.

Saturday, March 20, 2010

Pancakes don't count as baking, right?


Alton Brown taught me that pancakes and muffins are pretty much the same, but I didn't turn on the oven, so I'm saying it's okay.

I just got home from a lovely spring break in Ann Arbor. I came home to a scary refrigerator with little in it besides two pints of expired buttermilk and leftover soup I'd failed to throw out before leaving.

In desperation, I made pancakes. From Bisquick. With milk that expires today and eggs from who knows when...

Saving grace of these pancakes?? BUTTERSCOTCH CHIPS!! No really, just do it. I'm already plotting making butterscotch banana pancakes from scratch sometime soon.

Sunday, February 21, 2010

An Attempt to Curb Stress Baking


Hello readers,

Unfortunately for this blog, I gave up baking outside of bake sales for lent. This will probably mean fewer posts here until Easter.

This decision is based on a realization that if I bake it, I will eat it AND stress baking is not a good thing.

I might post some other recipes I make during lent just to keep things going, though thus far the only thing I've made is salmon and I have a brief due this week so most likely all I'll be making are things from a can.

Additionally, my desire to bake has never been higher since I told myself I wasn't allowed to, so I'll probably post some things I want to bake.

Love,
Christy

P.S. I went to a Pampered Chef party yesterday and bought mini-muffin tins. Probably will need an excuse to use those ASAP, so hopefully there's a bake sale coming up...

Tuesday, February 9, 2010

Red Velvet Cookies

I made these cookies for a bake sale this week. They're a really easy recipe, which I've co-opted from the wonderful Bakerella. I didn't use her frosting, but instead used Our Best Bites' awesome frosting and died it pinkish - maybe too pink. This frosting can cause pain and suffering because it doesn't always come together, but oh man, when it works, it's amazing.

Fair warning, this pretty much turned my kitchen reddish pink for a few hours. Do not bake if police are conducting a murder investigation in your building.

Monday, February 8, 2010

Mini Cherry Pies for Valentine's Day in a Muffin Pan


These are, by far, the cutest thing I have ever made. Interestingly, they are also easy, mess-free, and inexpensive.

I'm a big Aldi shopper when I can because you can usually good deals on random things and it's also an easy way to try out new things. For this recipe, I bought all the supplies at Aldi for less than $5.

Mini Cherry Pies

2 Refrigerated Pie Crusts (they come in a box together and are usually near the refrigerated cinnamon rolls)
1 Can Pie Filling
1 egg
Cooking Spray

1. Roll out one of the pie crusts. I used a cup with 3.75" diameter to cut out each crust - you might have to experiment a little bit to see what fits your muffin tin best. If you're careful, you should be able to get about six crusts out of each crust. Don't worry if you don't, as you can roll the scrap dough back out to get a few extra.
2. Spray a 12 cup muffin tin with cooking spray.
3. Press each circle into a muffin cup, being sure to push it all the way into the cup.
4. Fill each cup with approximately 6 cherries. They might overflow, but this should keep it to a minimum.
5. Create a top for the pies. I cut out little hearts and layered them, made a full top with a heart cut-out, and a lattice.
6. Whisk an egg in and brush the tops of the pies with egg. If you don't have a brush, you can use the back of a spoon.
7. Bake at 400 degrees for about 18 minutes. Watch these - they might burn! Since you're using a canned fruit, you don't have to worry so much about the fruit cooking through, just for the crust to brown.

Friday, February 5, 2010

Pear Raspberry Pie

This is a test run of a pie (from Martha Stewart - I used refrigerated crust and added almond extract to the filling) I'm planning to make for my roommates' and my party before Barrister's Ball next week. I don't make much in the realm of pie, but I wanted to make something Valentine's Day-y.

Coincidentally, my roommate is reading really unromantic Family Law cases to me and she's trying to be menacing by telling me that if I don't listen, I won't know when I'm not obligated to pay child support. Oh, darn it. Whatever will I do?

Law School Admissions Cupcakes (The better version of LSAC)


One of my friends from college lives in the town I go to law school in. He works for a local law firm here and had been planning to go to law school. Yesterday, he got into my law school and will be starting in the fall. As celebration, I naturally decided to bake cupcakes!

I immediately went to my default chocolate cupcake recipe from Our Best Bites (made with Ghiradelli cocoa powder) and baked them up. But what about frosting? It was cold, a bit icy, and my powdered sugar was in my car. (Don't ask...pretty much everything is in my car). So...I decided to fashion some frosting that was reminiscent of a chocolate pecan pie I made during the summer of 2007 AKA the summer I learned to bake.

Frosting/Glaze - frosts about 18 cupcakes, maybe a few more

1 Cup Chocolate Chips
1/2 Cup Corn Syrup
1/4 Cup Unsalted Butter
1/2 Cup Pecans

1. Melt the chocolate chips, corn syrup, and butter together in the microwave, stirring often to avoid burning.
2. Stir in pecans.
3. Spoon over cupcakes.

I was sort of dubious about potential taste, but actually, it's really awesome. It has a really marshmallow-y quality about it.

I was so glad to share these cupcakes with my friend who will soon know the wonders of intentional torts himself.

Tuesday, January 19, 2010

This blog lacks tortes, I know

So, for a blog that is supposed to be about tortes, I haven't posted any cakes. To remedy this, I baked two cakes over my break from law school.

Here is the coconut cake I baked on Christmas Eve for my family:

I went with this recipe, which was good but the frosting was more like marshmallow fluff then frosting. The cake was probably one of the most delicate I've ever made and had to be handled with extreme care.

I baked it at my dad's house, and unfortunately, they only had square layer pans AND a ridiculous oven that baked the cake in about 2/3 the amount of time it was supposed to take.

On the Christmas table, it was elevated and made it hard to see my little siblings. Hopefully, nothing tortious happened over there...

If it did, this one was probably the culprit:
Hard to believe, isn't it? She's got that, "Who, me?" look down.